HUNTING


CASUAL


The Science Of Animal Vision
Desolve Camouflage
THE FULL STORY BEHIND THE HUNDREDS OF HOURS OF RESEARCH
OUR PASSION PROJECT
In early 2014 our curiosity sent us down a path of research and development that lead to the creation of Desolve Camouflage, a pattern designed to fool animals, not hunters. Our research highlighted the massive problems with current “sticks and leaves” styles of mimicry camouflage. Ungulates (hooved animals) don’t see the way we do, their vision is blurrier so they don't focus on detail, instead they have been trained to identify outlines of shapes. Our new style of camo breaks up the outline with macro and micro shapes creating the illusion of depth, so the subject appears to be a series of small objects spread out across a range of distances. Desolve Camouflage was developed and tested in the field over the course of hundreds of hours to manipulate the specific colour and light tones most prominent to ungulates and the results are astounding.
WHY WE MADE DESOLVE CAMOUFLAGE
We are passionate hunters and have always had a drive to find bigger trophies, make longer shots and to get closer. So, to understand the animals better will give us the upper hand and enable us to do this. It seems that almost every hunter has a story about watching a deer on a clearing, whilst sitting dead still in the shade, down wind and hundreds of yards away, and all of a sudden that deer looks up and stares straight at them. These stories combined with the tales about UV light and enhanced vision dragged us on to the internet to try and understand the science behind animal vision and how we could improve the way we hide ourselves from hooved animals. What we found spurred us into action to make some drastic and urgent changes to the way we produced camouflage.
THE SCIENCE OF ANIMAL VISION

SCOPE AND CLARITY
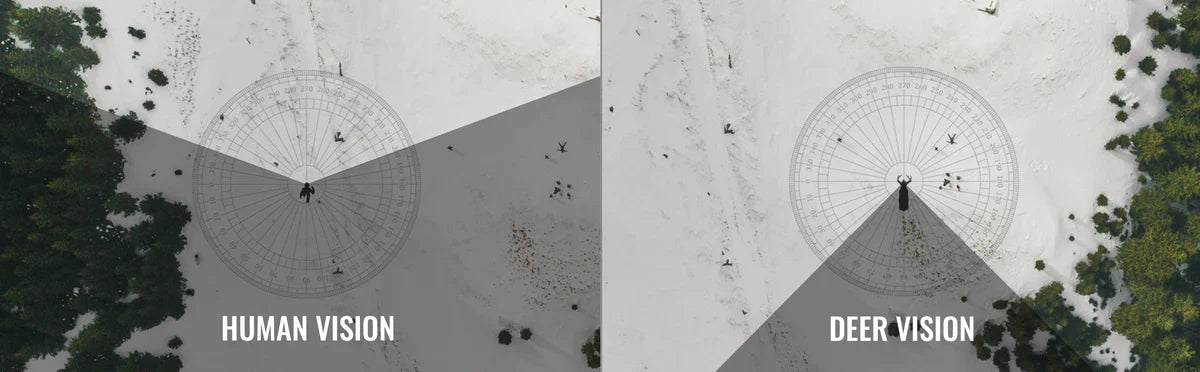
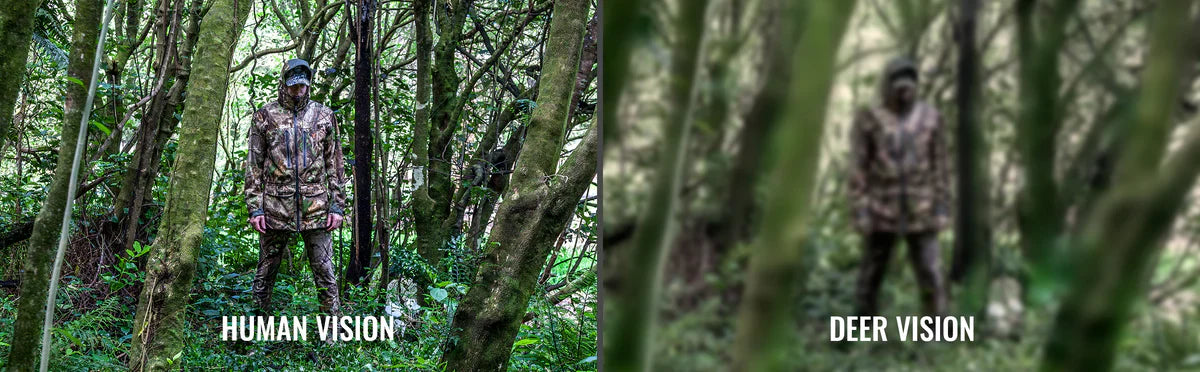
Most hooved animals have their eyes located on the side of their heads. Whilst this enables them to have a field of vision that spans about 270 degrees, the clarity with which they see is diminished. This is where it gets a bit technical and theoretical depending on which study you look at. The main finding is that both the detail and clarity are reduced in ungulate vision compared to human vision. The easiest way to think of this is to imagine that deer see a blurry image, as if they need glasses.
As they don’t see fine details they identify their potential threats based primarily on outlines and symmetry. They are able to identify silhouettes of object in their sights and can detect symmetry in that of a face of a human or other predator which is facing the prey. Both elements set off a warning signal to the prey of a potential threat.
What this tells us that the detail and realism of the leaf and stick shapes in the camouflage pattern are not very important as they aren’t able to be clearly defined by an ungulate anyway. What is important, is our outline. While trying to blend into the environment we still have a very defined outline which means we are still easily detected by Ungulates. This is paramount when we think about camouflaging ourselves from our prey.
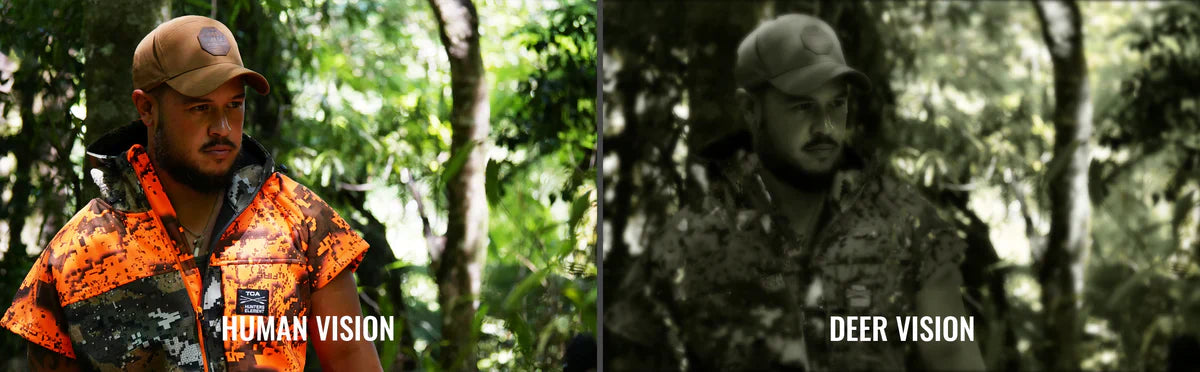

COLOUR-BLINDNESS
Almost all animal’s eyes are made up of a series of internal rods and cones. Each of these serves a function of interpreting light as shape and colour. Ungulates or hooved animals have been determined to lack the cones required to easily discern colours in the red spectrum. From this we can determine that they are effectively red-green colour-blind. This means that most shades of greens, browns, yellows, oranges and reds are all seen as one similar colour to deer. This is why hunters are able to wear bright blaze orange clothes without standing out from the natural surrounding environment. However, the other side of the colour table, blue, can be determined as extremely out of place in the natural environment to a deer just as it is to the human eye.
ULTRA VIOLET (UV) LIGHT
UV light can most easy be thought about from our perspective as a type of glowing light. The Human eye has a built-in filter which blocks out about 99% of UV light. If that filter wasn’t in our eyes, we would see some short-wavelength colours stand out from the crowd like something shiny reflecting in the sun light. The best example we can see of UV light is when looking at neon paints or bright white T-Shirts that glow in nightclubs under black lights. Ungulates do not have this filter covering their eyes, meaning these colours in the UV spectrum glow a lot brighter, especially in low light conditions. This UV glow doesn’t occur very often in the natural environment which is why this will alert an ungulate when these UV colours are present. A lot of modern dyes and laundry products used in the creation and washing of hunting clothing contain colour brighteners which in fact are UV enhancers. This may be why experienced hunters will often swear to have had more success at getting close to deer in their old “worn in” hunting clothes.
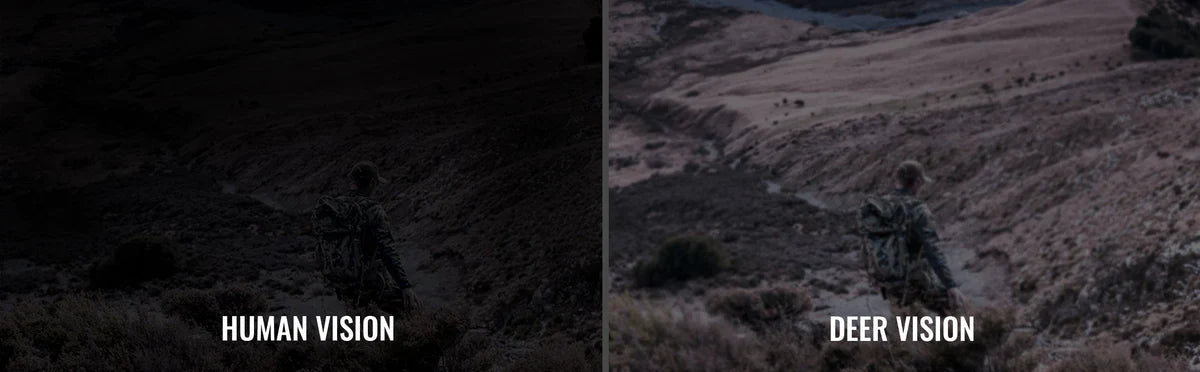

NIGHT VISION
How animals see at night shouldn’t really affect most hunters as we can’t see ourselves. However, it is interesting to shed some light on why deer are more likely to move around at first and last light. Ungulates have a layer in their eyes called the Tapetum Lucidum which sits just behind the retina. This layer acts like a type of mirror and this is what we see when shining a light at them at night. This layer sits at the back of the eye so that any light that isn’t absorbed by the retina on the first pass, gets a chance to be soaked up on the way back out.
Because of this process deer and most other hooved animals have far greater night vision than humans. This Tapetum Lucidum layer has probably evolved to give prey animals the ability to feed at night under the cover of darkness when their predators are in bed. Unfortunately for the prey however it seems that most of their natural predators, big cats, dogs etc, have evolved to keep up and now see just as well in the dark.

THE COMPLETE VIEW
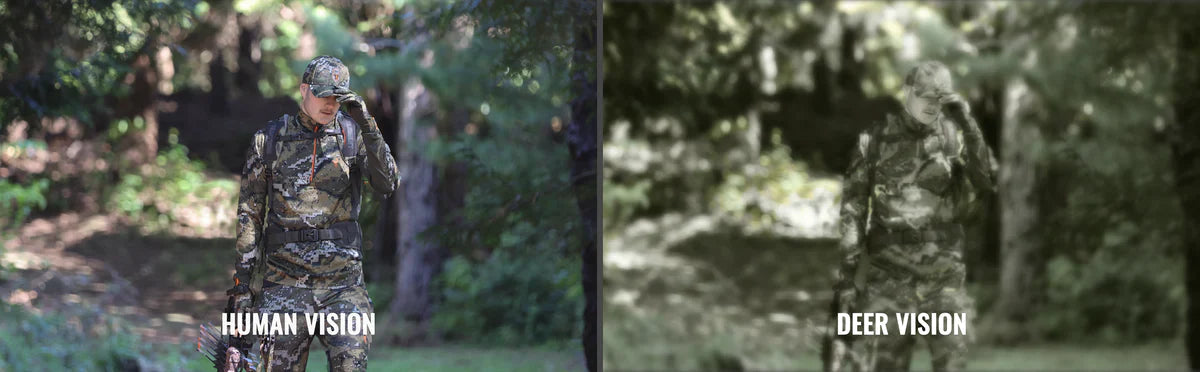
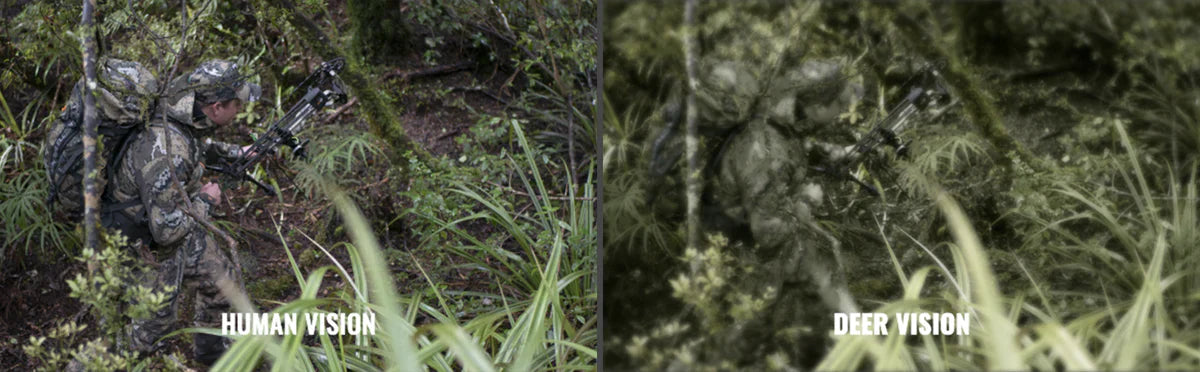
When all the elements are brought together the view looks unclear to our eyes. The important thing to consider is that although we cannot fully comprehend how the world would look through their eyes, we can use the individual aspects to draw a picture of how we can attempt to manipulate their weaknesses.
We know that details are lost and everything in the wide scope of vision is seen as shapes of colour, detected by their outline. Most yellows, oranges and reds are lost on them and are seen as different shades of greens or browns. It becomes clear that to truly be camouflaged, we must erase our outline by disrupting the ungulates depth perception using patterns and colours that they can see in the environment.

DISRUPTION VS MIMICRY
Traditional “mimicry” patterns use low contrast pictures or photos of sticks, leaves, bark and trees to mimic the environment which naturally look best to the human eye. Our vision is so much sharper than that of ungulates, so while we can interpret the details, the ungulates do not. With their cloudier vision, they perceive these as shapes of blurry colour with a defined outline.
Disruption on the other hand will in essence trick the animal’s eyes into not recognising the subject as one single object. Instead the use of different sized patterns creates the illusion of depth, breaking up this vitally important outline. To the animal it will look as though one part of the pattern is an object in the foreground, and another part of the pattern is an object in the distance. Based on the science behind their vision, this will be a far more effective and logical approach to not be seen and disappear into the backdrop. Disruption is therefore the key to fooling ungulates into not seeing us.
In essence, mimicry camo tries to trick the animal to believe that the subject is something that it isn’t, where disruption camo tricks the animal’s eyes into not seeing any subject at all.

DRAWING INSPIRATION FROM NATURE
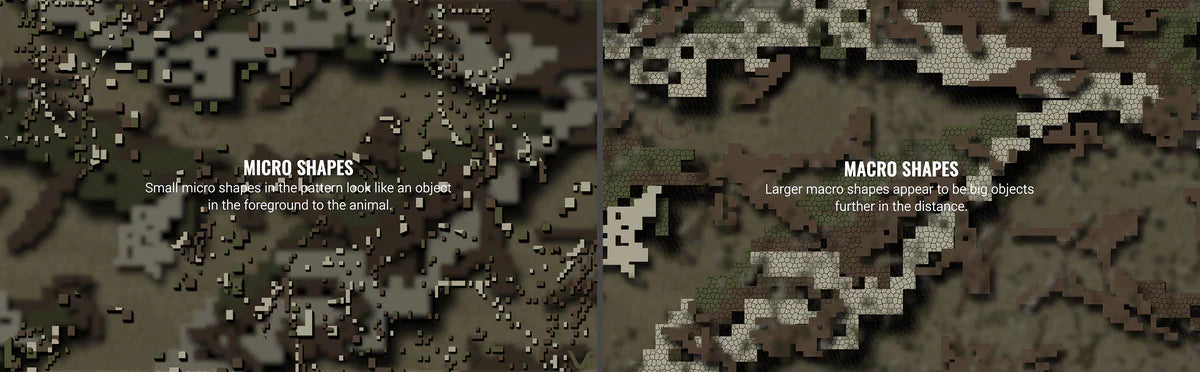
Both predators and prey throughout the entire animal kingdom utilize these elements of camouflage to disguise themselves. As hunters with a passion for the animals we target, we drew inspiration from some of these perfected hunting machines. Big cats are probably the best example of ungulate hunters and it is fascinating to see that they predominantly use two different methods of concealment. For example, Tigers use a macro or “broad range” pattern to conceal themselves. Their hunting style is more of a stalking method. This means that at a longer distance the tiger needs to be hidden as he closes the gap, much like a spot and stalk bow hunter. The leopard on the other hand uses a micro or “narrow range” pattern. Their hunting style is quite different in that they ambush their prey. They sit down tight and hide until the victim is close at which time they pounce. This hunting style could be compared to a hunter calling in close quarter rutting deer or tree stand hunting.
Combining these two styles of camouflage provides the deception of true position as it plays with the perception of depth. Macro patterns can be thought of as the big chunks in the pattern. These are the most important parts as they are the ones that break up the outline from about 20 meters away and beyond. The Micro patterns are the small pieces of the pattern. These are used to for primarily to add detail for when the subject is close and to add the natural intricacy of the environment. This is effectively used to break up the outlines of the Macro patterns, as if smaller objects were closer in range than the larger ones.

DEVELOPMENT AND TESTING
STAGE 1
With all this research behind us we proceeded to experiment with a large number of patterns that followed the principles of contrasting Micro and Macro patterns. We drew up a large grid template and experimented with different ratios of Micro and Macro patterns until we had a spread of three variants, one with more micro than macro, one about 50/50 and one with more macro than micro. These were then taken to the field for the initial testing phase. Three basic shades of green and brown were used initially with the intention of fine tuning later. We photographed the three patterns at varying distances of 20m, 50m, 100m and 300m, in three common and contrasting hunting terrains; forest, riverbed and open tops.
These images were then filtered with a series of blurring effects to replicate their lesser definition. Knowing what we learnt about the ungulates vision of colour, we removed the red colour spectrum to as close as we could determine an ungulate would see. From here we had a series of “animal vision” images that we could compare to determine the best at silhouette (outline) disruption. These blind tests quickly revealed that our 50/50 mix pattern was the best at creating this effect. With a few fine tweaks we had our first pattern ready for the next, more in-depth, testing phase.
STAGE 2
Now that we had our first pattern established the next step was to head back out into the field and experiment with it. We printed the pattern on large sheets on fabric and took them into the hills. We explored wrapping the sheets around trees, rocks, people and so on and viewed these from a number of different angles, in a large variety of terrains and backdrops, at varying distances. We photographed and filmed all of this so that we could later apply our animal vision filters to it.
A few things became apparent from in this second stage of testing which led us to develop the pattern further. First, we wanted to experiment with another size layer in our pattern. Something that would fit between the Micro and Macro size for a specific distance. At around 25m - 35m we felt the Micro was not quite doing enough to break up the Macro edges. Next, we needed to fine tune the colours to experiment with contrast. Contrary to mimicry patterns, the disruption pattern needs to be quite high contrast to give the illusion that two parts of the pattern are two different objects at different distances. We also decided to introduce a shadow element to our macro parts to help further this illusion of depth.
STAGE 3
As we were now starting to really fine tune the pattern, we created another series of samples with the most promising shades for further field testing. We followed the previous steps of testing in different terrains, light, distances and angles, and also started conducting some blind “Where’s Wally” type tests. From the countless hours poured into this testing we finally were able to proudly produce the Desolve Veil camouflage pattern.
COMPARING DESOLVE VEIL AGAINST MIMICRY PATTERNS
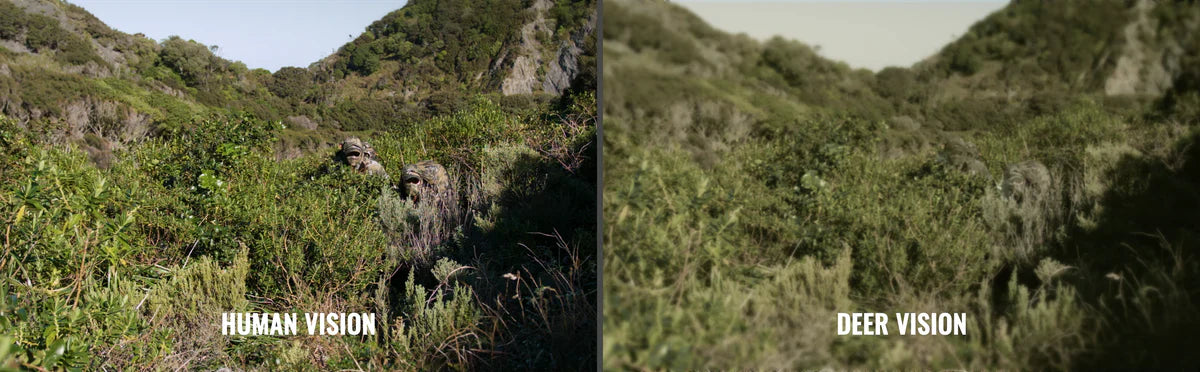
Now that we finally had a strong understanding of how ungulate vision worked and how we could take a different approach to camouflage, we were able to compare our new disruption pattern to the popular mimicry patterns. Once again, we headed into the field and photographed Desolve Veil next to the main mimicry patterns at a variety of ranges and terrains and applied our animal vision filters. The resulting images were astounding! The sticks and leaves patterns for the most part were instantly recognisable at all distances when not placed perfectly in amongst exact replicas of its pattern. The disruption pattern on the other hand melted seamlessly into just about every image, as we had found in our testing phases.
This final test provided us with validation. By wearing the Desolve Veil camouflage we were able to erase our outline and truly become camouflaged into the hunting terrains we tested; forest, riverbed and open tops. We successfully created the ultimate ungulate hunting camouflage pattern, Desolve Veil.

SOURCES
When it came to embarking on the major task of researching the properties of animal vision, we started by setting out some clear parameters around the process in order to try and remain as objective as possible. We believed that this would be crucial in achieving the best results for the development phase. This may seem obvious but it’s important to consider that we are all deep in the hunting world and had likely formed biases in how we expected the vision and patterns to work based on personal experiences, whether we knew it or not.
In short, the research was conducted by collecting over 50 sources of seemingly credible reports and articles both secondary and primary. The two criteria that we bound ourselves to were that they must have come from a qualified scientific background directly in the field of ungulate vision and the studies or papers must have been published since the year 2000.
From here we analysed all the research and extracted all the commonalities in the findings and excluded all the contradictory conjecture. This left us with clear objective findings that we could directly apply during the development phase of our new camouflage pattern.
Much of the research we used was long and quite technical in nature. However, listed below are links to some of the easier to read, straight to the point websites and articles that may be of interest: